Laatst vond ik in de kruidvat deze nailpolish pen, het leek me leuk om deze uit te proberen en voor jullie te reviewen! Oh trouwens dit is mijn 100ste post! Nooit gedacht dat ik het bloggen zó leuk zo vinden, dus even een dikke thanks voor iedereen die mij steunt/comment/volgt!
Last week I found this Nailpolish Pen in the Kruidvat (Dutch Drugsstore), so I thought: Why not, let's try it out and review it! Oh by the way this is my 100th post! I never thought that I liked blogging this much, so a big thanks for everyone who supports/comments/follows me!
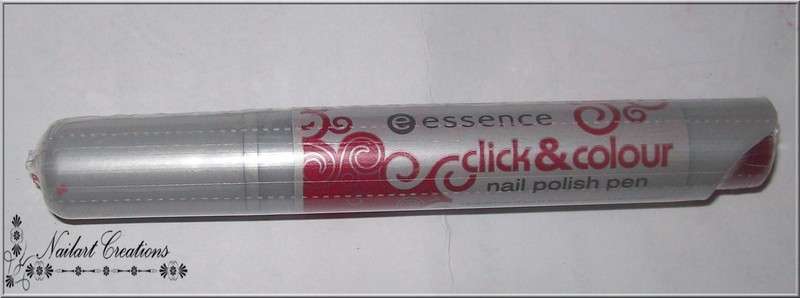
Laten we beginnen met de verpakking, hij is iets dikker dan een pen, en op de achterkant (Dat rode stukje) is een klikknopje. Verder vind ik het erg fijn dat dit product ingepakt in plastic is, zodat je geen last hebt van al dat nare plakband! Dit is trouwens de kleur Diva Red.
Let's start with the package, the pen is a little bit thicker than a normal pen, at the bottom you can see a little click button (the red thing on the bottom). Further I liked it that this one was in plastic, so I don't have the problems with removing tape and stickers! This one is the colour Diva Red.
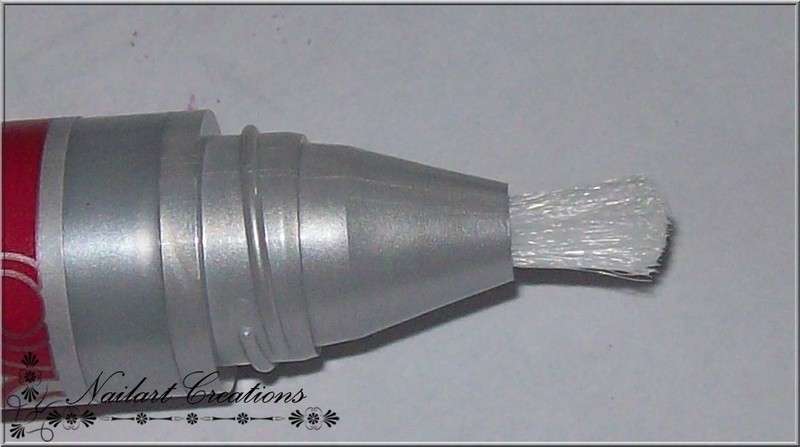
Hier zie je het kwastje die aan de pen vastzit, ik vond hem zelf erg groot vergeleken met een normaal nagellakkwastje.
Here you can see the brush, I was shocked to see this, wow, this is so much bigger than a regular nailpolish brush!
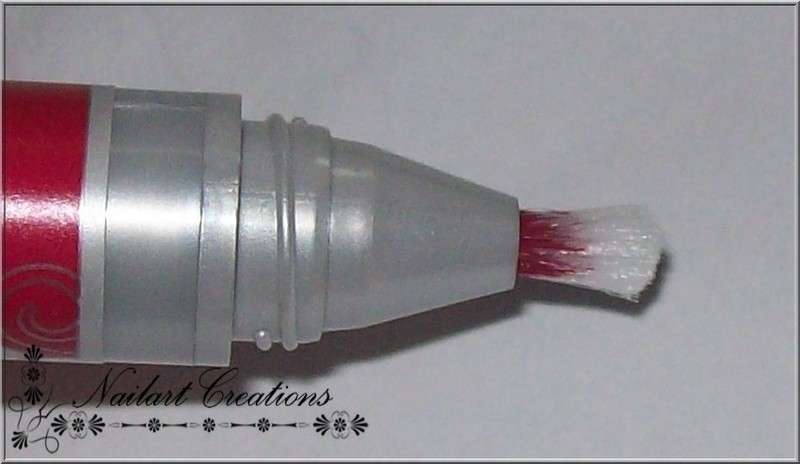
Na een paar keer klikken komt er steeds een klein beetje nagellak in het kwastje. Je moet echt behoorlijk vaak klikken voordat er een goede hoeveelheid lak op het kwastje zit, dus het is niet 1 keer klikken en lakken helaas.. Je moet ook goed uitkijken bij het klikken, voor je het weet heb je één keer te vaak geklikt en heb je een te grote hoeveelheid lak op het kwastje. Niet echt handig dus.
After a few clicks there's a small load of polish on the brush. So you've got to click a lot before you have a normal load of polish on the brush, so it's not one click and polish.. Make sure you really look good with clicking, you've got to click a lot, but you can click to much, then you've got a big blob on your brush, not the handiest thing!
Wanneer je de goede hoeveelheid lak op het kwastje hebt kun je je nagels gaan lakken. Door het enorme grote kwastje lakt dit niet bepaald lekker, je zit snel op je nagelriemen ipv enkel op je nagels. Ook heb je méér dan 1 laagje nodig voor een dekkend resultaat. Ik vind de lak ook erg bobbelig, als je de foto vergroot zie je goed dat de lak niet mooi egaal is.
When you've got the right load on your brush you can polish your nails. Because of the really big brush, polishing isn't very pretty, I polished everything including my nails (Normally I don't really have to do a clean up after polishing). You need a second coat for full coverage. I think the polish is a bit blob too, when you enlarge the pic you can see what I mean.
Conclusie/Conclusion:
Ik heb toch liever een gewoon nagellakpotje, dit is misschien handig voor dames die tussendoor ergens anders ff snel hun nagels willen lakken (niet aan te raden met de grote kwast). Verder betaal je geloof ik 3 euro voor deze pen, ik zou het er niet voor over hebben (Ik heb hem uit de uitverkoopbak gegraait) en zou liever een gewoon potje nagellak kopen!
I rather prefer a normal nailpolish, this may be handy for ladies who want to paint their nails very fast (I don't recommend because of the wide brush). Further you pay 3 euros for this pen, I don't think I would buy it for that prize (I bought it in sale) and rather buy a regular nailpolish.
Zijn er misschien meiden die wel een goede ervaring hebben met deze click & colour pennen?/Are there ladies who've got good experiences with this click & colour pens?
Vergeet niet om mee te doen met de winactie!/Don't forget to enter the giveaway!
Showing posts with label Review. Show all posts
Monday, November 1, 2010
Review: Essence Click & Colour Nailpolish Pen
Laatst vond ik in de kruidvat deze nailpolish pen, het leek me leuk om deze uit te proberen en voor jullie te reviewen! Oh trouwens dit is mijn 100ste post! Nooit gedacht dat ik het bloggen zó leuk zo vinden, dus even een dikke thanks voor iedereen die mij steunt/comment/volgt!
Last week I found this Nailpolish Pen in the Kruidvat (Dutch Drugsstore), so I thought: Why not, let's try it out and review it! Oh by the way this is my 100th post! I never thought that I liked blogging this much, so a big thanks for everyone who supports/comments/follows me!
Laten we beginnen met de verpakking, hij is iets dikker dan een pen, en op de achterkant (Dat rode stukje) is een klikknopje. Verder vind ik het erg fijn dat dit product ingepakt in plastic is, zodat je geen last hebt van al dat nare plakband! Dit is trouwens de kleur Diva Red.
Let's start with the package, the pen is a little bit thicker than a normal pen, at the bottom you can see a little click button (the red thing on the bottom). Further I liked it that this one was in plastic, so I don't have the problems with removing tape and stickers! This one is the colour Diva Red.
Hier zie je het kwastje die aan de pen vastzit, ik vond hem zelf erg groot vergeleken met een normaal nagellakkwastje.
Here you can see the brush, I was shocked to see this, wow, this is so much bigger than a regular nailpolish brush!
Na een paar keer klikken komt er steeds een klein beetje nagellak in het kwastje. Je moet echt behoorlijk vaak klikken voordat er een goede hoeveelheid lak op het kwastje zit, dus het is niet 1 keer klikken en lakken helaas.. Je moet ook goed uitkijken bij het klikken, voor je het weet heb je één keer te vaak geklikt en heb je een te grote hoeveelheid lak op het kwastje. Niet echt handig dus.
After a few clicks there's a small load of polish on the brush. So you've got to click a lot before you have a normal load of polish on the brush, so it's not one click and polish.. Make sure you really look good with clicking, you've got to click a lot, but you can click to much, then you've got a big blob on your brush, not the handiest thing!
Wanneer je de goede hoeveelheid lak op het kwastje hebt kun je je nagels gaan lakken. Door het enorme grote kwastje lakt dit niet bepaald lekker, je zit snel op je nagelriemen ipv enkel op je nagels. Ook heb je méér dan 1 laagje nodig voor een dekkend resultaat. Ik vind de lak ook erg bobbelig, als je de foto vergroot zie je goed dat de lak niet mooi egaal is.
When you've got the right load on your brush you can polish your nails. Because of the really big brush, polishing isn't very pretty, I polished everything including my nails (Normally I don't really have to do a clean up after polishing). You need a second coat for full coverage. I think the polish is a bit blob too, when you enlarge the pic you can see what I mean.
Conclusie/Conclusion:
Ik heb toch liever een gewoon nagellakpotje, dit is misschien handig voor dames die tussendoor ergens anders ff snel hun nagels willen lakken (niet aan te raden met de grote kwast). Verder betaal je geloof ik 3 euro voor deze pen, ik zou het er niet voor over hebben (Ik heb hem uit de uitverkoopbak gegraait) en zou liever een gewoon potje nagellak kopen!
I rather prefer a normal nailpolish, this may be handy for ladies who want to paint their nails very fast (I don't recommend because of the wide brush). Further you pay 3 euros for this pen, I don't think I would buy it for that prize (I bought it in sale) and rather buy a regular nailpolish.
Zijn er misschien meiden die wel een goede ervaring hebben met deze click & colour pennen?/Are there ladies who've got good experiences with this click & colour pens?
Vergeet niet om mee te doen met de winactie!/Don't forget to enter the giveaway!
Last week I found this Nailpolish Pen in the Kruidvat (Dutch Drugsstore), so I thought: Why not, let's try it out and review it! Oh by the way this is my 100th post! I never thought that I liked blogging this much, so a big thanks for everyone who supports/comments/follows me!
Laten we beginnen met de verpakking, hij is iets dikker dan een pen, en op de achterkant (Dat rode stukje) is een klikknopje. Verder vind ik het erg fijn dat dit product ingepakt in plastic is, zodat je geen last hebt van al dat nare plakband! Dit is trouwens de kleur Diva Red.
Let's start with the package, the pen is a little bit thicker than a normal pen, at the bottom you can see a little click button (the red thing on the bottom). Further I liked it that this one was in plastic, so I don't have the problems with removing tape and stickers! This one is the colour Diva Red.
Hier zie je het kwastje die aan de pen vastzit, ik vond hem zelf erg groot vergeleken met een normaal nagellakkwastje.
Here you can see the brush, I was shocked to see this, wow, this is so much bigger than a regular nailpolish brush!
Na een paar keer klikken komt er steeds een klein beetje nagellak in het kwastje. Je moet echt behoorlijk vaak klikken voordat er een goede hoeveelheid lak op het kwastje zit, dus het is niet 1 keer klikken en lakken helaas.. Je moet ook goed uitkijken bij het klikken, voor je het weet heb je één keer te vaak geklikt en heb je een te grote hoeveelheid lak op het kwastje. Niet echt handig dus.
After a few clicks there's a small load of polish on the brush. So you've got to click a lot before you have a normal load of polish on the brush, so it's not one click and polish.. Make sure you really look good with clicking, you've got to click a lot, but you can click to much, then you've got a big blob on your brush, not the handiest thing!
Wanneer je de goede hoeveelheid lak op het kwastje hebt kun je je nagels gaan lakken. Door het enorme grote kwastje lakt dit niet bepaald lekker, je zit snel op je nagelriemen ipv enkel op je nagels. Ook heb je méér dan 1 laagje nodig voor een dekkend resultaat. Ik vind de lak ook erg bobbelig, als je de foto vergroot zie je goed dat de lak niet mooi egaal is.
When you've got the right load on your brush you can polish your nails. Because of the really big brush, polishing isn't very pretty, I polished everything including my nails (Normally I don't really have to do a clean up after polishing). You need a second coat for full coverage. I think the polish is a bit blob too, when you enlarge the pic you can see what I mean.
Conclusie/Conclusion:
Ik heb toch liever een gewoon nagellakpotje, dit is misschien handig voor dames die tussendoor ergens anders ff snel hun nagels willen lakken (niet aan te raden met de grote kwast). Verder betaal je geloof ik 3 euro voor deze pen, ik zou het er niet voor over hebben (Ik heb hem uit de uitverkoopbak gegraait) en zou liever een gewoon potje nagellak kopen!
I rather prefer a normal nailpolish, this may be handy for ladies who want to paint their nails very fast (I don't recommend because of the wide brush). Further you pay 3 euros for this pen, I don't think I would buy it for that prize (I bought it in sale) and rather buy a regular nailpolish.
Zijn er misschien meiden die wel een goede ervaring hebben met deze click & colour pennen?/Are there ladies who've got good experiences with this click & colour pens?
Vergeet niet om mee te doen met de winactie!/Don't forget to enter the giveaway!
Review: Essence Click & Colour Nailpolish Pen
Laatst vond ik in de kruidvat deze nailpolish pen, het leek me leuk om deze uit te proberen en voor jullie te reviewen! Oh trouwens dit is mijn 100ste post! Nooit gedacht dat ik het bloggen zó leuk zo vinden, dus even een dikke thanks voor iedereen die mij steunt/comment/volgt!
Last week I found this Nailpolish Pen in the Kruidvat (Dutch Drugsstore), so I thought: Why not, let's try it out and review it! Oh by the way this is my 100th post! I never thought that I liked blogging this much, so a big thanks for everyone who supports/comments/follows me!
Laten we beginnen met de verpakking, hij is iets dikker dan een pen, en op de achterkant (Dat rode stukje) is een klikknopje. Verder vind ik het erg fijn dat dit product ingepakt in plastic is, zodat je geen last hebt van al dat nare plakband! Dit is trouwens de kleur Diva Red.
Let's start with the package, the pen is a little bit thicker than a normal pen, at the bottom you can see a little click button (the red thing on the bottom). Further I liked it that this one was in plastic, so I don't have the problems with removing tape and stickers! This one is the colour Diva Red.
Hier zie je het kwastje die aan de pen vastzit, ik vond hem zelf erg groot vergeleken met een normaal nagellakkwastje.
Here you can see the brush, I was shocked to see this, wow, this is so much bigger than a regular nailpolish brush!
Na een paar keer klikken komt er steeds een klein beetje nagellak in het kwastje. Je moet echt behoorlijk vaak klikken voordat er een goede hoeveelheid lak op het kwastje zit, dus het is niet 1 keer klikken en lakken helaas.. Je moet ook goed uitkijken bij het klikken, voor je het weet heb je één keer te vaak geklikt en heb je een te grote hoeveelheid lak op het kwastje. Niet echt handig dus.
After a few clicks there's a small load of polish on the brush. So you've got to click a lot before you have a normal load of polish on the brush, so it's not one click and polish.. Make sure you really look good with clicking, you've got to click a lot, but you can click to much, then you've got a big blob on your brush, not the handiest thing!
Wanneer je de goede hoeveelheid lak op het kwastje hebt kun je je nagels gaan lakken. Door het enorme grote kwastje lakt dit niet bepaald lekker, je zit snel op je nagelriemen ipv enkel op je nagels. Ook heb je méér dan 1 laagje nodig voor een dekkend resultaat. Ik vind de lak ook erg bobbelig, als je de foto vergroot zie je goed dat de lak niet mooi egaal is.
When you've got the right load on your brush you can polish your nails. Because of the really big brush, polishing isn't very pretty, I polished everything including my nails (Normally I don't really have to do a clean up after polishing). You need a second coat for full coverage. I think the polish is a bit blob too, when you enlarge the pic you can see what I mean.
Conclusie/Conclusion:
Ik heb toch liever een gewoon nagellakpotje, dit is misschien handig voor dames die tussendoor ergens anders ff snel hun nagels willen lakken (niet aan te raden met de grote kwast). Verder betaal je geloof ik 3 euro voor deze pen, ik zou het er niet voor over hebben (Ik heb hem uit de uitverkoopbak gegraait) en zou liever een gewoon potje nagellak kopen!
I rather prefer a normal nailpolish, this may be handy for ladies who want to paint their nails very fast (I don't recommend because of the wide brush). Further you pay 3 euros for this pen, I don't think I would buy it for that prize (I bought it in sale) and rather buy a regular nailpolish.
Zijn er misschien meiden die wel een goede ervaring hebben met deze click & colour pennen?/Are there ladies who've got good experiences with this click & colour pens?
Vergeet niet om mee te doen met de winactie!/Don't forget to enter the giveaway!
Last week I found this Nailpolish Pen in the Kruidvat (Dutch Drugsstore), so I thought: Why not, let's try it out and review it! Oh by the way this is my 100th post! I never thought that I liked blogging this much, so a big thanks for everyone who supports/comments/follows me!
Laten we beginnen met de verpakking, hij is iets dikker dan een pen, en op de achterkant (Dat rode stukje) is een klikknopje. Verder vind ik het erg fijn dat dit product ingepakt in plastic is, zodat je geen last hebt van al dat nare plakband! Dit is trouwens de kleur Diva Red.
Let's start with the package, the pen is a little bit thicker than a normal pen, at the bottom you can see a little click button (the red thing on the bottom). Further I liked it that this one was in plastic, so I don't have the problems with removing tape and stickers! This one is the colour Diva Red.
Hier zie je het kwastje die aan de pen vastzit, ik vond hem zelf erg groot vergeleken met een normaal nagellakkwastje.
Here you can see the brush, I was shocked to see this, wow, this is so much bigger than a regular nailpolish brush!
Na een paar keer klikken komt er steeds een klein beetje nagellak in het kwastje. Je moet echt behoorlijk vaak klikken voordat er een goede hoeveelheid lak op het kwastje zit, dus het is niet 1 keer klikken en lakken helaas.. Je moet ook goed uitkijken bij het klikken, voor je het weet heb je één keer te vaak geklikt en heb je een te grote hoeveelheid lak op het kwastje. Niet echt handig dus.
After a few clicks there's a small load of polish on the brush. So you've got to click a lot before you have a normal load of polish on the brush, so it's not one click and polish.. Make sure you really look good with clicking, you've got to click a lot, but you can click to much, then you've got a big blob on your brush, not the handiest thing!
Wanneer je de goede hoeveelheid lak op het kwastje hebt kun je je nagels gaan lakken. Door het enorme grote kwastje lakt dit niet bepaald lekker, je zit snel op je nagelriemen ipv enkel op je nagels. Ook heb je méér dan 1 laagje nodig voor een dekkend resultaat. Ik vind de lak ook erg bobbelig, als je de foto vergroot zie je goed dat de lak niet mooi egaal is.
When you've got the right load on your brush you can polish your nails. Because of the really big brush, polishing isn't very pretty, I polished everything including my nails (Normally I don't really have to do a clean up after polishing). You need a second coat for full coverage. I think the polish is a bit blob too, when you enlarge the pic you can see what I mean.
Conclusie/Conclusion:
Ik heb toch liever een gewoon nagellakpotje, dit is misschien handig voor dames die tussendoor ergens anders ff snel hun nagels willen lakken (niet aan te raden met de grote kwast). Verder betaal je geloof ik 3 euro voor deze pen, ik zou het er niet voor over hebben (Ik heb hem uit de uitverkoopbak gegraait) en zou liever een gewoon potje nagellak kopen!
I rather prefer a normal nailpolish, this may be handy for ladies who want to paint their nails very fast (I don't recommend because of the wide brush). Further you pay 3 euros for this pen, I don't think I would buy it for that prize (I bought it in sale) and rather buy a regular nailpolish.
Zijn er misschien meiden die wel een goede ervaring hebben met deze click & colour pennen?/Are there ladies who've got good experiences with this click & colour pens?
Vergeet niet om mee te doen met de winactie!/Don't forget to enter the giveaway!
Wednesday, October 20, 2010
Review Mavala Nailpolish Thinner
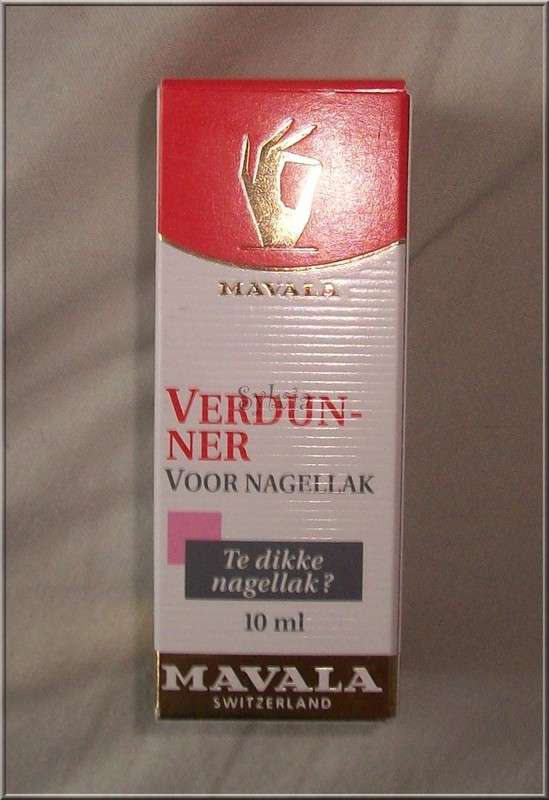
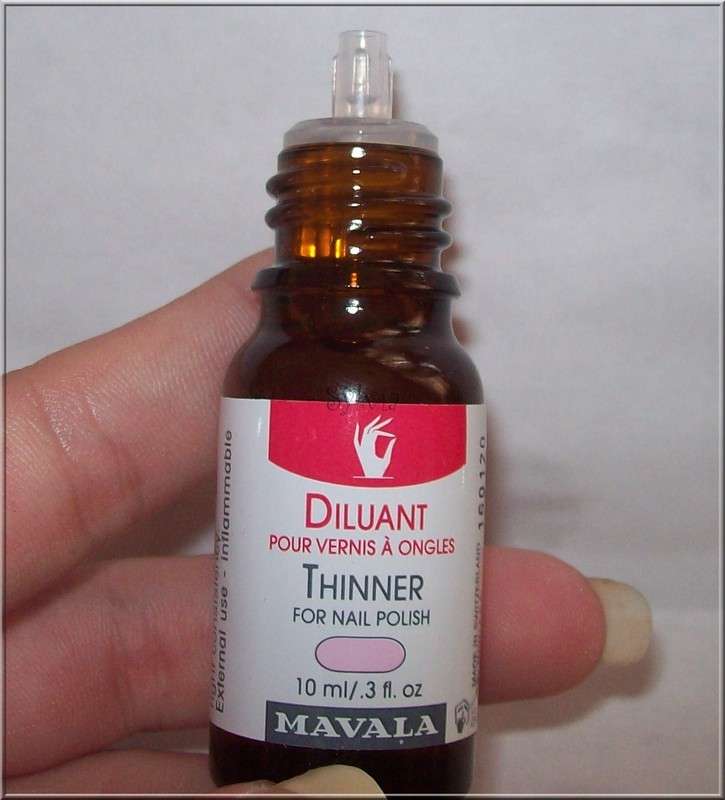
Vorige week kreeg ik na 8 lange weken éindelijk een belletje dat de nagellakverdunner welke ik besteld had binnen was! En aangezien ik genoeg dikke stroperige lakjes kon vinden heb ik hem meteen even uitgeprobeerd en een review gemaakt. Hierboven zie je al hoe de verpakking van deze nagellakverdunner eruit ziet. De nagellakverdunner komt bij de Douglas vandaan, en heeft €8,00 gekost.
Finally! Last week I've got a call that the nailpolish thinner (which I ordered) has arrived! So I've got a few thick polishes which I wanted to thin, and I made a review! Above you can see the package, it's a nailpolish thinner from Mavala. I bought it for €8.00 at the Douglas (Dutch store)
Zo ziet het flesje er zelf uit, er zit 10 ml verdunner in. De bovenkant van het potje is echt een soort van druppelpipet, ontzettend handig want je gooit zo niet in 1x de gehele inhoud in je nagellakflesje!
This is what the bottle looks like, it contains 10 ml nailpolish thinner. The top of the bottle is made with a dropper, so you can't accidently throw the whole content in your nailpolish!
Dus ik ben op zoek gegaan naar een dik lakje en kwam bij deze uit, dit is een lakje van M Nailpolish, ik heb deze al een lange tijd en zoals je al aan het kwastje kunt zien was het een aardige dikke drab geworden, tijd om uit te vinden of de verdunner echt werkt!
So I searched a thick nailpolish, and found this one. As you can see the polish on the brush is one big thick mess, time to research the nailpolish thinner!
Ik heb steeds één druppel verdunner in het flesje gedaan en ben toen gaan schudden. Ik heb uiteindelijk zo'n 4 druppels gebruikt om deze lak weer een beetje dun te krijgen. Zoals je op bovenstaande foto al kan zien was de lak enorm dik, en is hij nu weer mooi vloeibaar en goed smeerbaar!
Every time I used one drop of thinner and after that just shake the bottle. At the end I used 4 drops of thinner to make this polish normal again, as you can see on the pic the polish was really thick!
Pluspunten/Good sides
- De verdunner werkt echt!/ Good thinner
- Druppelpipet/Dropper
Minpunten/Bad sides
- De prijs ( €8.00 vind ik best prijzig voor zo'n klein flesje, en er bestaan goedkopere varianten)/ The price ( €8.00 is expensive for such a little bottle, and there are cheaper brands)
- De inhoud, na het verdunnen van 3 nagellakjes ben ik al ruim door 1/3 van de verdunner heen/ The volume, after thinning 3 nailpolishes I already used 1/3 of the bottle.
Vergeet niet om mee te doen met de winactie!/Don't forget to enter the giveaway!
Finally! Last week I've got a call that the nailpolish thinner (which I ordered) has arrived! So I've got a few thick polishes which I wanted to thin, and I made a review! Above you can see the package, it's a nailpolish thinner from Mavala. I bought it for €8.00 at the Douglas (Dutch store)
Zo ziet het flesje er zelf uit, er zit 10 ml verdunner in. De bovenkant van het potje is echt een soort van druppelpipet, ontzettend handig want je gooit zo niet in 1x de gehele inhoud in je nagellakflesje!
This is what the bottle looks like, it contains 10 ml nailpolish thinner. The top of the bottle is made with a dropper, so you can't accidently throw the whole content in your nailpolish!
Dus ik ben op zoek gegaan naar een dik lakje en kwam bij deze uit, dit is een lakje van M Nailpolish, ik heb deze al een lange tijd en zoals je al aan het kwastje kunt zien was het een aardige dikke drab geworden, tijd om uit te vinden of de verdunner echt werkt!
So I searched a thick nailpolish, and found this one. As you can see the polish on the brush is one big thick mess, time to research the nailpolish thinner!
Ik heb steeds één druppel verdunner in het flesje gedaan en ben toen gaan schudden. Ik heb uiteindelijk zo'n 4 druppels gebruikt om deze lak weer een beetje dun te krijgen. Zoals je op bovenstaande foto al kan zien was de lak enorm dik, en is hij nu weer mooi vloeibaar en goed smeerbaar!
Every time I used one drop of thinner and after that just shake the bottle. At the end I used 4 drops of thinner to make this polish normal again, as you can see on the pic the polish was really thick!
Pluspunten/Good sides
- De verdunner werkt echt!/ Good thinner
- Druppelpipet/Dropper
Minpunten/Bad sides
- De prijs ( €8.00 vind ik best prijzig voor zo'n klein flesje, en er bestaan goedkopere varianten)/ The price ( €8.00 is expensive for such a little bottle, and there are cheaper brands)
- De inhoud, na het verdunnen van 3 nagellakjes ben ik al ruim door 1/3 van de verdunner heen/ The volume, after thinning 3 nailpolishes I already used 1/3 of the bottle.
Vergeet niet om mee te doen met de winactie!/Don't forget to enter the giveaway!
Review Mavala Nailpolish Thinner
Vorige week kreeg ik na 8 lange weken éindelijk een belletje dat de nagellakverdunner welke ik besteld had binnen was! En aangezien ik genoeg dikke stroperige lakjes kon vinden heb ik hem meteen even uitgeprobeerd en een review gemaakt. Hierboven zie je al hoe de verpakking van deze nagellakverdunner eruit ziet. De nagellakverdunner komt bij de Douglas vandaan, en heeft €8,00 gekost.
Finally! Last week I've got a call that the nailpolish thinner (which I ordered) has arrived! So I've got a few thick polishes which I wanted to thin, and I made a review! Above you can see the package, it's a nailpolish thinner from Mavala. I bought it for €8.00 at the Douglas (Dutch store)
Zo ziet het flesje er zelf uit, er zit 10 ml verdunner in. De bovenkant van het potje is echt een soort van druppelpipet, ontzettend handig want je gooit zo niet in 1x de gehele inhoud in je nagellakflesje!
This is what the bottle looks like, it contains 10 ml nailpolish thinner. The top of the bottle is made with a dropper, so you can't accidently throw the whole content in your nailpolish!
Dus ik ben op zoek gegaan naar een dik lakje en kwam bij deze uit, dit is een lakje van M Nailpolish, ik heb deze al een lange tijd en zoals je al aan het kwastje kunt zien was het een aardige dikke drab geworden, tijd om uit te vinden of de verdunner echt werkt!
So I searched a thick nailpolish, and found this one. As you can see the polish on the brush is one big thick mess, time to research the nailpolish thinner!
Ik heb steeds één druppel verdunner in het flesje gedaan en ben toen gaan schudden. Ik heb uiteindelijk zo'n 4 druppels gebruikt om deze lak weer een beetje dun te krijgen. Zoals je op bovenstaande foto al kan zien was de lak enorm dik, en is hij nu weer mooi vloeibaar en goed smeerbaar!
Every time I used one drop of thinner and after that just shake the bottle. At the end I used 4 drops of thinner to make this polish normal again, as you can see on the pic the polish was really thick!
Pluspunten/Good sides
- De verdunner werkt echt!/ Good thinner
- Druppelpipet/Dropper
Minpunten/Bad sides
- De prijs ( €8.00 vind ik best prijzig voor zo'n klein flesje, en er bestaan goedkopere varianten)/ The price ( €8.00 is expensive for such a little bottle, and there are cheaper brands)
- De inhoud, na het verdunnen van 3 nagellakjes ben ik al ruim door 1/3 van de verdunner heen/ The volume, after thinning 3 nailpolishes I already used 1/3 of the bottle.
Vergeet niet om mee te doen met de winactie!/Don't forget to enter the giveaway!
Finally! Last week I've got a call that the nailpolish thinner (which I ordered) has arrived! So I've got a few thick polishes which I wanted to thin, and I made a review! Above you can see the package, it's a nailpolish thinner from Mavala. I bought it for €8.00 at the Douglas (Dutch store)
Zo ziet het flesje er zelf uit, er zit 10 ml verdunner in. De bovenkant van het potje is echt een soort van druppelpipet, ontzettend handig want je gooit zo niet in 1x de gehele inhoud in je nagellakflesje!
This is what the bottle looks like, it contains 10 ml nailpolish thinner. The top of the bottle is made with a dropper, so you can't accidently throw the whole content in your nailpolish!
Dus ik ben op zoek gegaan naar een dik lakje en kwam bij deze uit, dit is een lakje van M Nailpolish, ik heb deze al een lange tijd en zoals je al aan het kwastje kunt zien was het een aardige dikke drab geworden, tijd om uit te vinden of de verdunner echt werkt!
So I searched a thick nailpolish, and found this one. As you can see the polish on the brush is one big thick mess, time to research the nailpolish thinner!
Ik heb steeds één druppel verdunner in het flesje gedaan en ben toen gaan schudden. Ik heb uiteindelijk zo'n 4 druppels gebruikt om deze lak weer een beetje dun te krijgen. Zoals je op bovenstaande foto al kan zien was de lak enorm dik, en is hij nu weer mooi vloeibaar en goed smeerbaar!
Every time I used one drop of thinner and after that just shake the bottle. At the end I used 4 drops of thinner to make this polish normal again, as you can see on the pic the polish was really thick!
Pluspunten/Good sides
- De verdunner werkt echt!/ Good thinner
- Druppelpipet/Dropper
Minpunten/Bad sides
- De prijs ( €8.00 vind ik best prijzig voor zo'n klein flesje, en er bestaan goedkopere varianten)/ The price ( €8.00 is expensive for such a little bottle, and there are cheaper brands)
- De inhoud, na het verdunnen van 3 nagellakjes ben ik al ruim door 1/3 van de verdunner heen/ The volume, after thinning 3 nailpolishes I already used 1/3 of the bottle.
Vergeet niet om mee te doen met de winactie!/Don't forget to enter the giveaway!
Review Mavala Nailpolish Thinner
Vorige week kreeg ik na 8 lange weken éindelijk een belletje dat de nagellakverdunner welke ik besteld had binnen was! En aangezien ik genoeg dikke stroperige lakjes kon vinden heb ik hem meteen even uitgeprobeerd en een review gemaakt. Hierboven zie je al hoe de verpakking van deze nagellakverdunner eruit ziet. De nagellakverdunner komt bij de Douglas vandaan, en heeft €8,00 gekost.
Finally! Last week I've got a call that the nailpolish thinner (which I ordered) has arrived! So I've got a few thick polishes which I wanted to thin, and I made a review! Above you can see the package, it's a nailpolish thinner from Mavala. I bought it for €8.00 at the Douglas (Dutch store)
Zo ziet het flesje er zelf uit, er zit 10 ml verdunner in. De bovenkant van het potje is echt een soort van druppelpipet, ontzettend handig want je gooit zo niet in 1x de gehele inhoud in je nagellakflesje!
This is what the bottle looks like, it contains 10 ml nailpolish thinner. The top of the bottle is made with a dropper, so you can't accidently throw the whole content in your nailpolish!
Dus ik ben op zoek gegaan naar een dik lakje en kwam bij deze uit, dit is een lakje van M Nailpolish, ik heb deze al een lange tijd en zoals je al aan het kwastje kunt zien was het een aardige dikke drab geworden, tijd om uit te vinden of de verdunner echt werkt!
So I searched a thick nailpolish, and found this one. As you can see the polish on the brush is one big thick mess, time to research the nailpolish thinner!
Ik heb steeds één druppel verdunner in het flesje gedaan en ben toen gaan schudden. Ik heb uiteindelijk zo'n 4 druppels gebruikt om deze lak weer een beetje dun te krijgen. Zoals je op bovenstaande foto al kan zien was de lak enorm dik, en is hij nu weer mooi vloeibaar en goed smeerbaar!
Every time I used one drop of thinner and after that just shake the bottle. At the end I used 4 drops of thinner to make this polish normal again, as you can see on the pic the polish was really thick!
Pluspunten/Good sides
- De verdunner werkt echt!/ Good thinner
- Druppelpipet/Dropper
Minpunten/Bad sides
- De prijs ( €8.00 vind ik best prijzig voor zo'n klein flesje, en er bestaan goedkopere varianten)/ The price ( €8.00 is expensive for such a little bottle, and there are cheaper brands)
- De inhoud, na het verdunnen van 3 nagellakjes ben ik al ruim door 1/3 van de verdunner heen/ The volume, after thinning 3 nailpolishes I already used 1/3 of the bottle.
Vergeet niet om mee te doen met de winactie!/Don't forget to enter the giveaway!
Finally! Last week I've got a call that the nailpolish thinner (which I ordered) has arrived! So I've got a few thick polishes which I wanted to thin, and I made a review! Above you can see the package, it's a nailpolish thinner from Mavala. I bought it for €8.00 at the Douglas (Dutch store)
Zo ziet het flesje er zelf uit, er zit 10 ml verdunner in. De bovenkant van het potje is echt een soort van druppelpipet, ontzettend handig want je gooit zo niet in 1x de gehele inhoud in je nagellakflesje!
This is what the bottle looks like, it contains 10 ml nailpolish thinner. The top of the bottle is made with a dropper, so you can't accidently throw the whole content in your nailpolish!
Dus ik ben op zoek gegaan naar een dik lakje en kwam bij deze uit, dit is een lakje van M Nailpolish, ik heb deze al een lange tijd en zoals je al aan het kwastje kunt zien was het een aardige dikke drab geworden, tijd om uit te vinden of de verdunner echt werkt!
So I searched a thick nailpolish, and found this one. As you can see the polish on the brush is one big thick mess, time to research the nailpolish thinner!
Ik heb steeds één druppel verdunner in het flesje gedaan en ben toen gaan schudden. Ik heb uiteindelijk zo'n 4 druppels gebruikt om deze lak weer een beetje dun te krijgen. Zoals je op bovenstaande foto al kan zien was de lak enorm dik, en is hij nu weer mooi vloeibaar en goed smeerbaar!
Every time I used one drop of thinner and after that just shake the bottle. At the end I used 4 drops of thinner to make this polish normal again, as you can see on the pic the polish was really thick!
Pluspunten/Good sides
- De verdunner werkt echt!/ Good thinner
- Druppelpipet/Dropper
Minpunten/Bad sides
- De prijs ( €8.00 vind ik best prijzig voor zo'n klein flesje, en er bestaan goedkopere varianten)/ The price ( €8.00 is expensive for such a little bottle, and there are cheaper brands)
- De inhoud, na het verdunnen van 3 nagellakjes ben ik al ruim door 1/3 van de verdunner heen/ The volume, after thinning 3 nailpolishes I already used 1/3 of the bottle.
Vergeet niet om mee te doen met de winactie!/Don't forget to enter the giveaway!
Friday, October 15, 2010
Review Aloë Vera Handgel
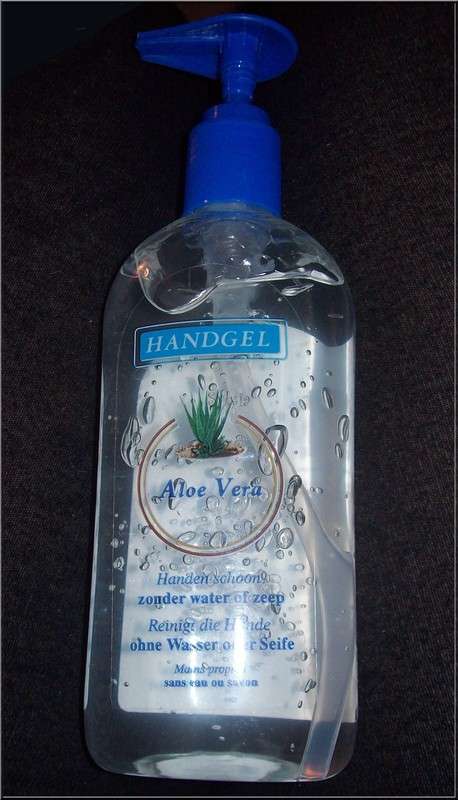
De Aloë Vera desinfecterende handgel is een product wat ik al een tijdje in huis heb. Ik ben zelf erg tevreden over dit product, dus tijd voor een review!
I own the Aloë Vera desinfected Handgel for a while, and i'm very happy with it, so it's review time!
Beschrijving van het product: Met deze handgel reinigt u uw handen zonder het gebruik van water of zeep. Verrijkt met verzorgende aloë vera voor een zachte en soepele huid. Geeft u na ieder gebruik een fris, schoon en zeker gevoel.
Ik ben van mening dat deze beschrijving goed overeen komt met het product, mn handen voelen na het gebruik idd zacht aan!
Ook nog even de ingrediënten (alhoewel ik er wel bij moet zeggen dat dat mij niet heel veel zegt): o.a. alcohol, aqua, carbomer, glyserin, aloe barbadensis, aminomethyl en propanol.
This is what the bottles says about the product: With this handgel you desinfect your hands without using water or soap. Enriched with caring Aloë Vera for a soft and smooth skin. After using it gives you a fresh, clean and insured fealing.
I think this says the good thing about the products, I definitely agree with this!
And these are the ingrediënts (I've got to say that I don't know much about them..): o.a. alcohol, aqua, carbomer, glyserin, aloe barbadensis, aminomethyl en propanol.
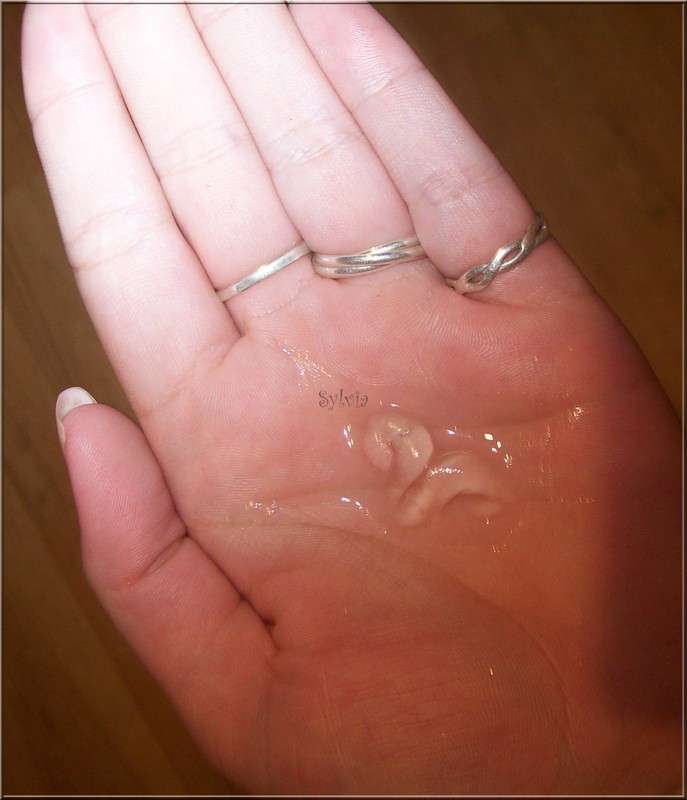
Dit is een beetje een vreemde foto, maar zo ziet de gel eruit op je handen. Het heeft echt een gelstructuur, (deze foto is na een tijdje gemaakt dus het begon al waterig te worden). Wanneer je het dus een tijdje op je handen laat liggen wordt het heel waterig, natuurlijk is dit niet de bedoeling dus je moet het lekker in je handen wrijven. Wanneer je handen nog vochtig zijn vind ik de geur zelf echt heel erg stinken, maar wanneer het in je handen getrokken is ruikt het echt heerlijk fris!
This is a bit of a weird pic, but this is the gel on my hands. It definitely got a gelstructure ( this pic is taken after a while, so the gel is a bit watery). When you put in on your hands, after a while it's just like water. But that's not the meaning of this product, you've got to rub it on your hands. When you're hands are still wet, the smell is horrible! When it's repealed in your hands, the smell is lovely!
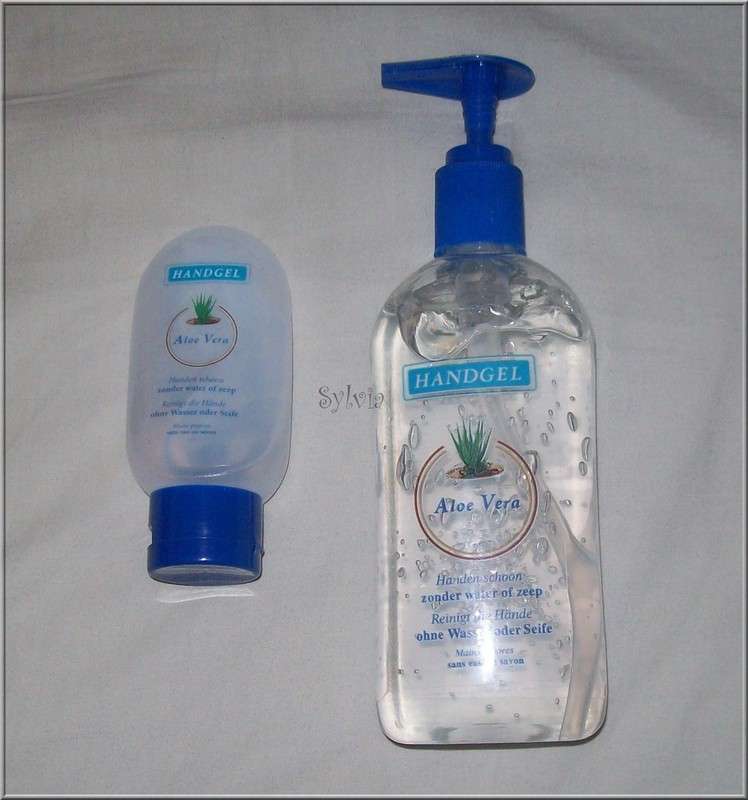
Deze handgel bestaat ook in een supermakkelijke kleine uitvoering voor in je tas! Het kleine flesje bevat 70 ml en de grote fles bevat 300 ml. Je doet trouwens ook heel lang met een fles! Deze handgel is verkrijgbaar bij de Action voor minder dan €1,50, de kleine flesjes kun je trouwens per 3 kopen en zijn superhandig om mee te nemen, ik heb er altijd 1 bij me!
This handgel is available in a smaller bottle for in your bag too! The small bottle contains 70 ml and the big one contains 300 ml. You can use one bottle for a very long time! This handgel is available at the Action ( a store in the Netherlands) for less than €1,50, the small bottles are available per three, and are easy to take with you, I've got one in every bag!
I own the Aloë Vera desinfected Handgel for a while, and i'm very happy with it, so it's review time!
Beschrijving van het product: Met deze handgel reinigt u uw handen zonder het gebruik van water of zeep. Verrijkt met verzorgende aloë vera voor een zachte en soepele huid. Geeft u na ieder gebruik een fris, schoon en zeker gevoel.
Ik ben van mening dat deze beschrijving goed overeen komt met het product, mn handen voelen na het gebruik idd zacht aan!
Ook nog even de ingrediënten (alhoewel ik er wel bij moet zeggen dat dat mij niet heel veel zegt): o.a. alcohol, aqua, carbomer, glyserin, aloe barbadensis, aminomethyl en propanol.
This is what the bottles says about the product: With this handgel you desinfect your hands without using water or soap. Enriched with caring Aloë Vera for a soft and smooth skin. After using it gives you a fresh, clean and insured fealing.
I think this says the good thing about the products, I definitely agree with this!
And these are the ingrediënts (I've got to say that I don't know much about them..): o.a. alcohol, aqua, carbomer, glyserin, aloe barbadensis, aminomethyl en propanol.
Dit is een beetje een vreemde foto, maar zo ziet de gel eruit op je handen. Het heeft echt een gelstructuur, (deze foto is na een tijdje gemaakt dus het begon al waterig te worden). Wanneer je het dus een tijdje op je handen laat liggen wordt het heel waterig, natuurlijk is dit niet de bedoeling dus je moet het lekker in je handen wrijven. Wanneer je handen nog vochtig zijn vind ik de geur zelf echt heel erg stinken, maar wanneer het in je handen getrokken is ruikt het echt heerlijk fris!
This is a bit of a weird pic, but this is the gel on my hands. It definitely got a gelstructure ( this pic is taken after a while, so the gel is a bit watery). When you put in on your hands, after a while it's just like water. But that's not the meaning of this product, you've got to rub it on your hands. When you're hands are still wet, the smell is horrible! When it's repealed in your hands, the smell is lovely!
Deze handgel bestaat ook in een supermakkelijke kleine uitvoering voor in je tas! Het kleine flesje bevat 70 ml en de grote fles bevat 300 ml. Je doet trouwens ook heel lang met een fles! Deze handgel is verkrijgbaar bij de Action voor minder dan €1,50, de kleine flesjes kun je trouwens per 3 kopen en zijn superhandig om mee te nemen, ik heb er altijd 1 bij me!
This handgel is available in a smaller bottle for in your bag too! The small bottle contains 70 ml and the big one contains 300 ml. You can use one bottle for a very long time! This handgel is available at the Action ( a store in the Netherlands) for less than €1,50, the small bottles are available per three, and are easy to take with you, I've got one in every bag!
Review Aloë Vera Handgel
De Aloë Vera desinfecterende handgel is een product wat ik al een tijdje in huis heb. Ik ben zelf erg tevreden over dit product, dus tijd voor een review!
I own the Aloë Vera desinfected Handgel for a while, and i'm very happy with it, so it's review time!
Beschrijving van het product: Met deze handgel reinigt u uw handen zonder het gebruik van water of zeep. Verrijkt met verzorgende aloë vera voor een zachte en soepele huid. Geeft u na ieder gebruik een fris, schoon en zeker gevoel.
Ik ben van mening dat deze beschrijving goed overeen komt met het product, mn handen voelen na het gebruik idd zacht aan!
Ook nog even de ingrediënten (alhoewel ik er wel bij moet zeggen dat dat mij niet heel veel zegt): o.a. alcohol, aqua, carbomer, glyserin, aloe barbadensis, aminomethyl en propanol.
This is what the bottles says about the product: With this handgel you desinfect your hands without using water or soap. Enriched with caring Aloë Vera for a soft and smooth skin. After using it gives you a fresh, clean and insured fealing.
I think this says the good thing about the products, I definitely agree with this!
And these are the ingrediënts (I've got to say that I don't know much about them..): o.a. alcohol, aqua, carbomer, glyserin, aloe barbadensis, aminomethyl en propanol.
Dit is een beetje een vreemde foto, maar zo ziet de gel eruit op je handen. Het heeft echt een gelstructuur, (deze foto is na een tijdje gemaakt dus het begon al waterig te worden). Wanneer je het dus een tijdje op je handen laat liggen wordt het heel waterig, natuurlijk is dit niet de bedoeling dus je moet het lekker in je handen wrijven. Wanneer je handen nog vochtig zijn vind ik de geur zelf echt heel erg stinken, maar wanneer het in je handen getrokken is ruikt het echt heerlijk fris!
This is a bit of a weird pic, but this is the gel on my hands. It definitely got a gelstructure ( this pic is taken after a while, so the gel is a bit watery). When you put in on your hands, after a while it's just like water. But that's not the meaning of this product, you've got to rub it on your hands. When you're hands are still wet, the smell is horrible! When it's repealed in your hands, the smell is lovely!
Deze handgel bestaat ook in een supermakkelijke kleine uitvoering voor in je tas! Het kleine flesje bevat 70 ml en de grote fles bevat 300 ml. Je doet trouwens ook heel lang met een fles! Deze handgel is verkrijgbaar bij de Action voor minder dan €1,50, de kleine flesjes kun je trouwens per 3 kopen en zijn superhandig om mee te nemen, ik heb er altijd 1 bij me!
This handgel is available in a smaller bottle for in your bag too! The small bottle contains 70 ml and the big one contains 300 ml. You can use one bottle for a very long time! This handgel is available at the Action ( a store in the Netherlands) for less than €1,50, the small bottles are available per three, and are easy to take with you, I've got one in every bag!
I own the Aloë Vera desinfected Handgel for a while, and i'm very happy with it, so it's review time!
Beschrijving van het product: Met deze handgel reinigt u uw handen zonder het gebruik van water of zeep. Verrijkt met verzorgende aloë vera voor een zachte en soepele huid. Geeft u na ieder gebruik een fris, schoon en zeker gevoel.
Ik ben van mening dat deze beschrijving goed overeen komt met het product, mn handen voelen na het gebruik idd zacht aan!
Ook nog even de ingrediënten (alhoewel ik er wel bij moet zeggen dat dat mij niet heel veel zegt): o.a. alcohol, aqua, carbomer, glyserin, aloe barbadensis, aminomethyl en propanol.
This is what the bottles says about the product: With this handgel you desinfect your hands without using water or soap. Enriched with caring Aloë Vera for a soft and smooth skin. After using it gives you a fresh, clean and insured fealing.
I think this says the good thing about the products, I definitely agree with this!
And these are the ingrediënts (I've got to say that I don't know much about them..): o.a. alcohol, aqua, carbomer, glyserin, aloe barbadensis, aminomethyl en propanol.
Dit is een beetje een vreemde foto, maar zo ziet de gel eruit op je handen. Het heeft echt een gelstructuur, (deze foto is na een tijdje gemaakt dus het begon al waterig te worden). Wanneer je het dus een tijdje op je handen laat liggen wordt het heel waterig, natuurlijk is dit niet de bedoeling dus je moet het lekker in je handen wrijven. Wanneer je handen nog vochtig zijn vind ik de geur zelf echt heel erg stinken, maar wanneer het in je handen getrokken is ruikt het echt heerlijk fris!
This is a bit of a weird pic, but this is the gel on my hands. It definitely got a gelstructure ( this pic is taken after a while, so the gel is a bit watery). When you put in on your hands, after a while it's just like water. But that's not the meaning of this product, you've got to rub it on your hands. When you're hands are still wet, the smell is horrible! When it's repealed in your hands, the smell is lovely!
Deze handgel bestaat ook in een supermakkelijke kleine uitvoering voor in je tas! Het kleine flesje bevat 70 ml en de grote fles bevat 300 ml. Je doet trouwens ook heel lang met een fles! Deze handgel is verkrijgbaar bij de Action voor minder dan €1,50, de kleine flesjes kun je trouwens per 3 kopen en zijn superhandig om mee te nemen, ik heb er altijd 1 bij me!
This handgel is available in a smaller bottle for in your bag too! The small bottle contains 70 ml and the big one contains 300 ml. You can use one bottle for a very long time! This handgel is available at the Action ( a store in the Netherlands) for less than €1,50, the small bottles are available per three, and are easy to take with you, I've got one in every bag!
Tuesday, August 31, 2010
Max Nailpolish review
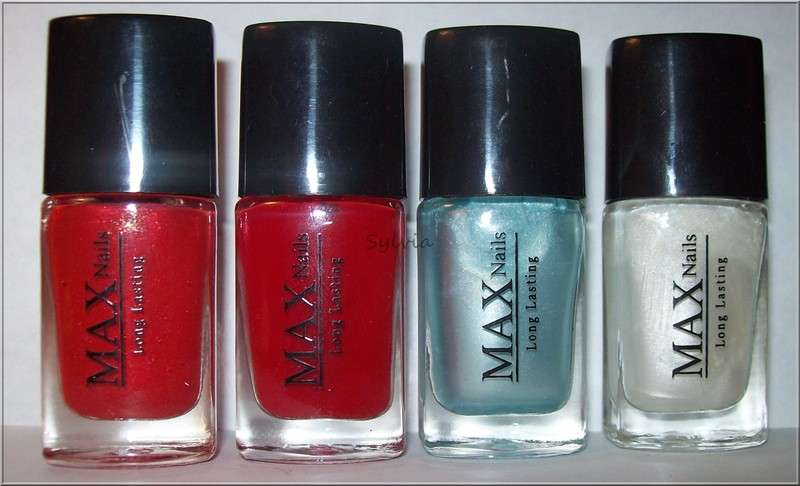
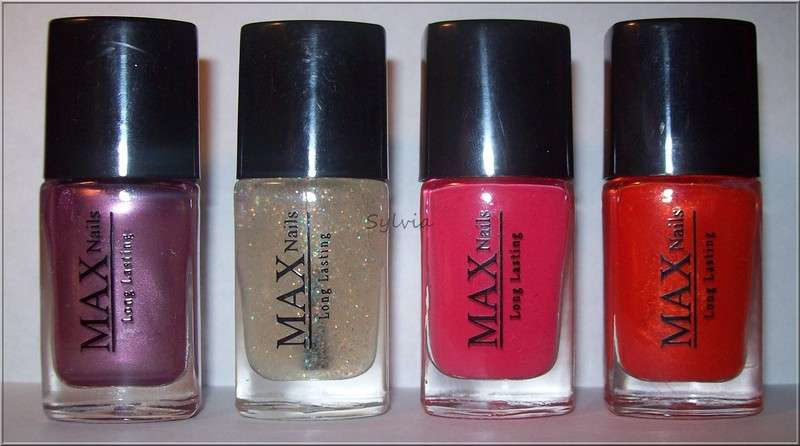
When I was at a local store, I saw these funny polishes, so reviewingtime! I was really curious if these polishes were really polishes to use, because they were supercheap: €0.45 p. polish. A big profit is that the polishes have names, so they're recognicable (I really hate polishes without names and numbers, I always lose them in my stash, and never use them again). Alright the review!
From left to right: Rose Red, Riviera Red, Blue Pearl and Pearl
From left to right: Light Purple, Diamond Sky, Peach and Coral Red.
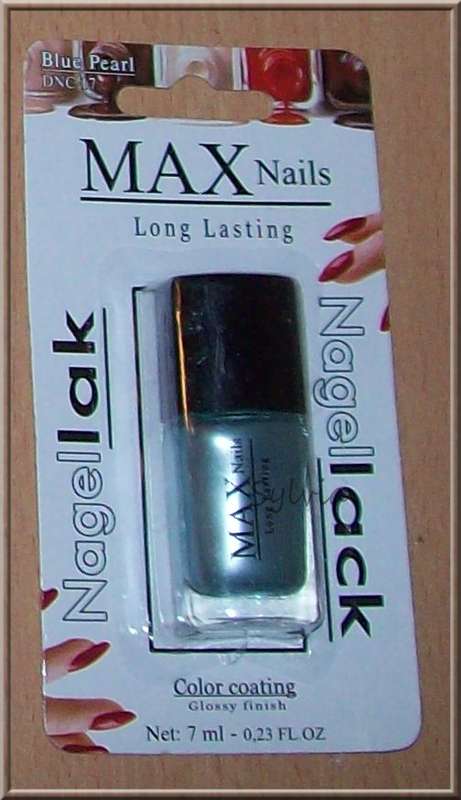
Above you can see how the packing looks like, on the left side you can see the name of the polish (you can also read the name below the bottom on a sticker). I think a packing is really handy, now you now that nobody used the polishes before! Some names are a bit strange, who calls a polish Coral Red when it's orange? Or call it Peach while the polish is bright pink!?
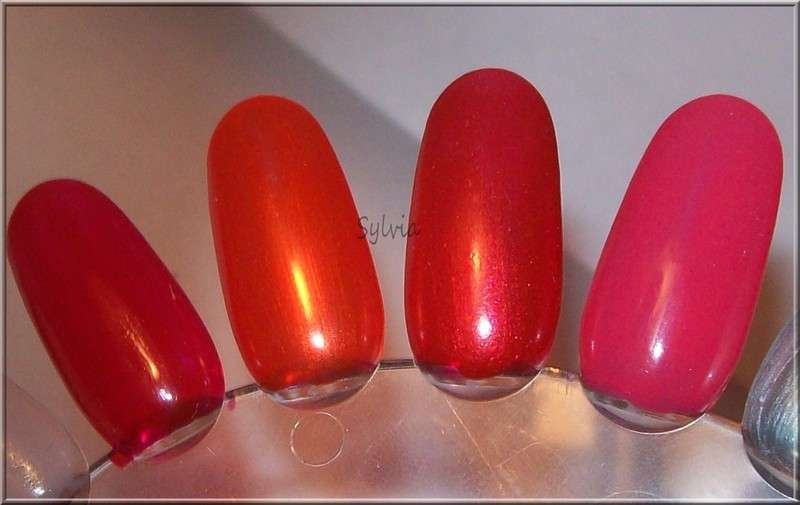
Above you can see Riviera Red, Coral Red, Rose Red and Peach on the wheels. Now you can see a bit of the colours. They're just fine! After 2 layers you have above result ( The picture isn't very good with the colours btw). Swatches on my nails are coming later.
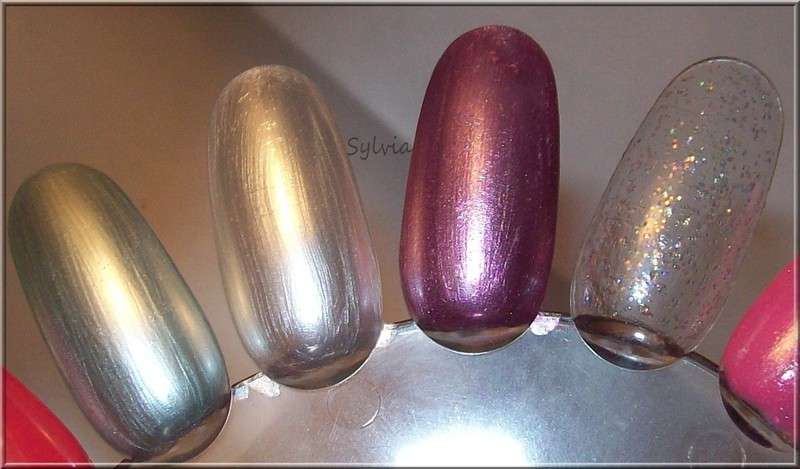
And here you can see Blue Pearl, Pearl, Light Purple and Diamond Sky. Especially the last one is not nice on this picture, Diamond Sky has glitters in every colour! Blue Pearl and Pearl are very streaky, these 2 are less nicer polishes. Light Purple is a bit of a known polish, it looks a bit like a polish I have from Essence I think.. Swatches on my nails are coming later too.
Dus nog even alle voor en nadelen op een rijtje:/ So all the benefits and disadvantages:
Voordelen/Benefits
- Goedkoop/Cheap
- Goede dekking/ Opaque
- Handige verpakking/ Good package
Nadelen/Disadvantages:
- Sommige zijn wat streperig/Some of them are a bit streaky
Barst maar los wat jullie van deze lakjes vinden, ik ben benieuwd!/ Tell me what you think of these polishes!
Thanks for reading!
Friday, August 20, 2010
Review: Suhada French Manicure Set
Een tijdje terug bij de post: New Stuff, zagen jullie al een French Manicure setje voorbij komen. Ik heb deze uitgebreid uitgeprobeerd, dus nu ga ik hem reviewen voor jullie! Het setje is van het merk Suhada, wat mij dus helemaal niets zegt, maar daarom des te leuk om uit te proberen.
A while ago in the post: New Stuff, you saw a French Manicure set. I tried this one, so I'm now going to review this product for you! The kit is from the branch Suhada, which is totally unknown for me, but anyway, It's just more fun to try it.
Dit zat er dus in het doosje, excuses voor de ietwat wazige foto. Maar dit was de inhoud: French Manicure guidelines, basecoat, white coat, topcoat, vijl, nagelriemstokjes en teenspreiders. Achterin het doosje zit ook nog een heel lief suedezakje.
So this was in the box (I'm sorry for the bad picture). But this was inside: French Manicure guidelines, basecoat, white coat, topcoat, a file, cuticle sticks and toenail spreaders. Behind in the box there was also a cute little suède bag.
Stap 1 is het opdoen van de basecoat, zoals op bovenstaande foto. De basecoat die in deze set zat is een rozige basecoat, dus zoals je kunt zien geeft deze een rozige kleur af, welke een extra natuurlijke look aan je nagels hoort te geven.
Step 1 is gaining the basecoat, as you can see on the photo above. The basecoat in this kit was a little bit pink, so it looks a little bit pink on your nails. This is for accenting your real nails.
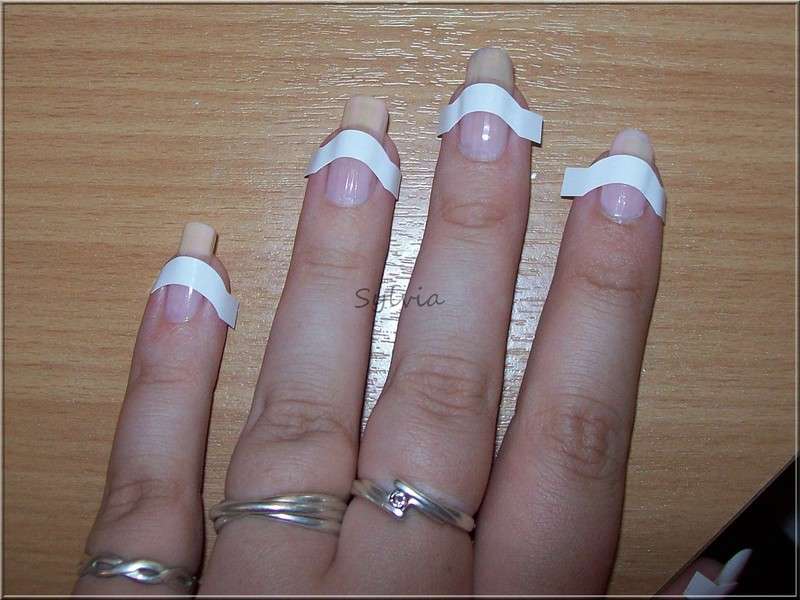
Stap 2 is de guidelines op je nagels plaatsen. Zorg dat je de guidelines iets boven het randje van je natuurlijke nagel plaatst. Je moet er wel voor zorgen dat de basecoat echt heel goed droog is, op één nagel was ik iets te snel met de guideline, en dat zag je dus heel goed na het afhalen van de guideline. De guidelines heb ik geplaatst met een pincet, zodat de lijmlaag goed op de sjablonen blijft zitten. Deze guidelines plakken trouwens ontzettend goed!
Step 2 is placing the guidelines. Make sure you put the guidelines a little bit above the edge of your natural nails. Oh and make sure that the basecoat is really dry, I put one guideline to fast on my nail, and you can really see that when you remove the guideline. I've placed the guidelines with tweezers, so the glue is intact. These guidelines stick really good!
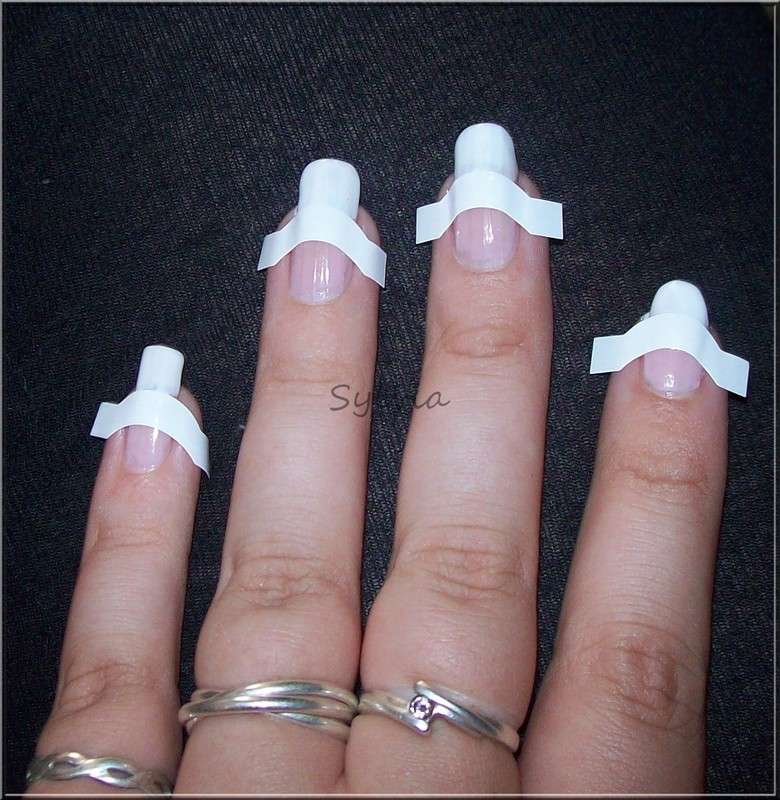
Stap 3 is de whitecoat over de tips van je nagels lakken. Door de guidelines heb je dus geen vaste hand nodig en kun je gewoon op je gemak de tips wit maken. Het maakt ook niet uit of je uitschiet over de guidelines heen (zorg er natuurlijk wel voor dat je er niet aan de andere kant van de guidelines overheen gaat ;)).
Step 3 is putting the whitecoat on your tips. Because of the guidelines you don't need a steady hand. And you can polish a little bit over the guidelines (just make sure you don't polish the other side of the guidelines ;)).
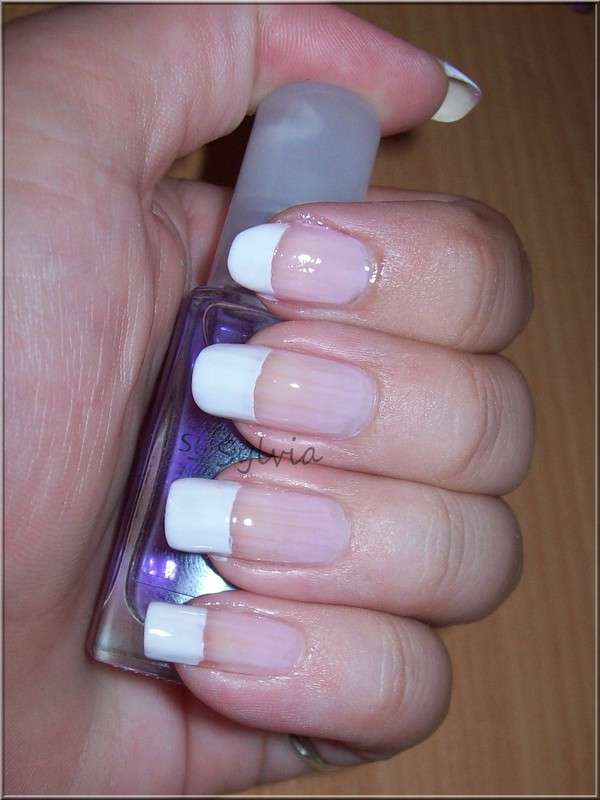
De laatste stap is de topcoat. Dit geeft een glanzend effect. Wat me wel heel erg opvalt aan deze set is dat je ondanks dat je echt nagellak gebruikt, je een ontzettende 'fake nagels' look krijgt.
The last step is applying the topcoat. This is for the shiny effect. But.. despite of using nailpolish, you really create a fake nails look.
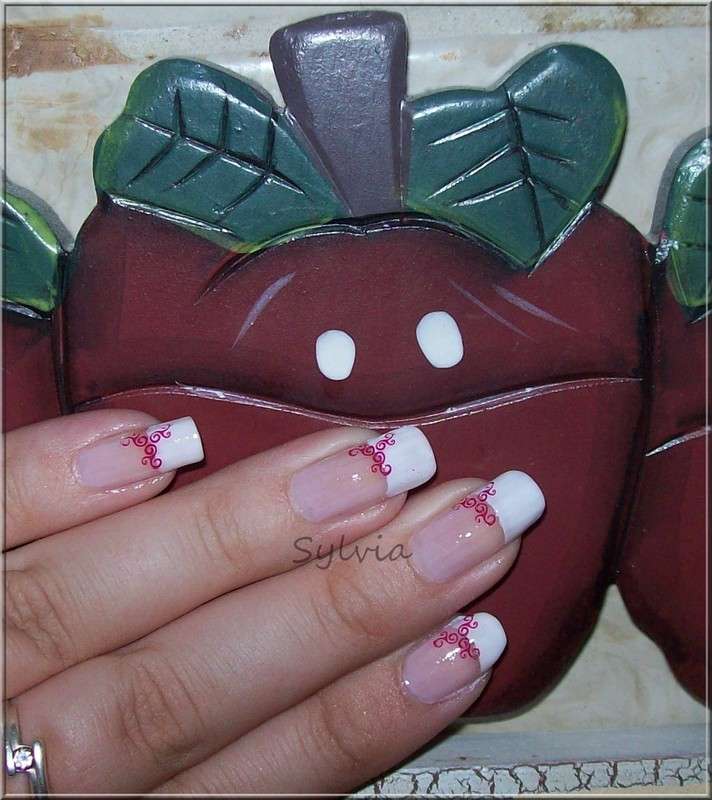
Uiteindelijk heb ik er zelf nog wat overheen gestempeld zodat het niet zo'n hele saaie look geeft. Deze stempel komt van één van de Essence plates af, en is alweer gestempeld met Catrice - Let's talk about barrie!
At the end I've added some stamping, because it was really boring without any nailart. This stamp is from one of the Essence plates, and is stamped with Catrice - Let's talk about Barrie!
Mijn eindconclusie van deze set is ontzettend positief, ondanks dat het enigsinds een fake nagel effect geeft is het wel erg mooi. Ook heeft dit er 8 dagen perfect zonder enige chips opgezeten. Juist ook omdat de prijs heel goedkoop is, is dit echt heel verwonderlijk! Dit setje heeft mij €5,- gekost, en is te verkrijgen bij de Lidl, deze set heb je ook in een beige variant, ik heb dus de roze.
My conclusion is really positive. One little disadvantage is the fake nail look. The rest is positive, this French Manicure hold 8 days perfectly on my nails without chipping. The prize is really positive, It costs €5,- and you can buy it in the Lidl (Dutch supermarket), this kit is available in the colours beige and pink.
Thanks for reading!
A while ago in the post: New Stuff, you saw a French Manicure set. I tried this one, so I'm now going to review this product for you! The kit is from the branch Suhada, which is totally unknown for me, but anyway, It's just more fun to try it.
So this was in the box (I'm sorry for the bad picture). But this was inside: French Manicure guidelines, basecoat, white coat, topcoat, a file, cuticle sticks and toenail spreaders. Behind in the box there was also a cute little suède bag.
Step 1 is gaining the basecoat, as you can see on the photo above. The basecoat in this kit was a little bit pink, so it looks a little bit pink on your nails. This is for accenting your real nails.
Step 2 is placing the guidelines. Make sure you put the guidelines a little bit above the edge of your natural nails. Oh and make sure that the basecoat is really dry, I put one guideline to fast on my nail, and you can really see that when you remove the guideline. I've placed the guidelines with tweezers, so the glue is intact. These guidelines stick really good!
Step 3 is putting the whitecoat on your tips. Because of the guidelines you don't need a steady hand. And you can polish a little bit over the guidelines (just make sure you don't polish the other side of the guidelines ;)).
The last step is applying the topcoat. This is for the shiny effect. But.. despite of using nailpolish, you really create a fake nails look.
At the end I've added some stamping, because it was really boring without any nailart. This stamp is from one of the Essence plates, and is stamped with Catrice - Let's talk about Barrie!
Mijn eindconclusie van deze set is ontzettend positief, ondanks dat het enigsinds een fake nagel effect geeft is het wel erg mooi. Ook heeft dit er 8 dagen perfect zonder enige chips opgezeten. Juist ook omdat de prijs heel goedkoop is, is dit echt heel verwonderlijk! Dit setje heeft mij €5,- gekost, en is te verkrijgen bij de Lidl, deze set heb je ook in een beige variant, ik heb dus de roze.
My conclusion is really positive. One little disadvantage is the fake nail look. The rest is positive, this French Manicure hold 8 days perfectly on my nails without chipping. The prize is really positive, It costs €5,- and you can buy it in the Lidl (Dutch supermarket), this kit is available in the colours beige and pink.
Thanks for reading!
Subscribe to:
Posts (Atom)